WARNING: GORY PICTURES DEEMED TOO NASTY FOR THE MAGAZINE!
Taxidermy – an old country craft is not hard, if you know what to do.… this article deemed a little too extreme for the magazine
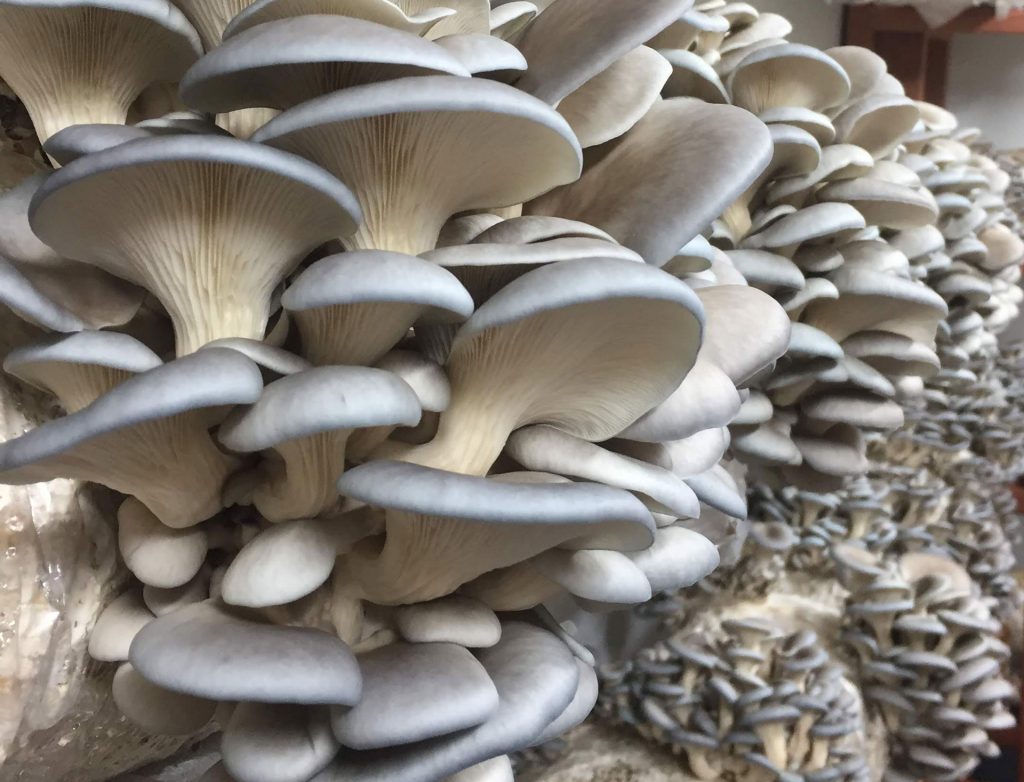
There were two books that my parents slightly regretted me owning. One was Richard Mabey’s Food for Free. Still a definitive guide for British foragers, I got it for Christmas and came home from my Boxing Day mooch, with some wild mushrooms that I had found that looked really frightening. They were delicious, Pleurotus ostreatus or the oyster mushroom, now sold in Sainsbury’s. My mama was agitated when I brought them home and made me go get reference books to show her to prove they were safe.
The other one looked really worthy and was called ‘365 Things To Do’. It was from America and depressed me a little, as a middle kid with no space to call my own, as the first bit was all about how to set up your home workshop with a bench and pegboard for your tools. I envied the little bastard.
But one day, I found the page all about taxidermy and I was gripped. I had always collected stuff like fossils and had a cabinet like a museum’s to put specimens in, repurposed from a shop that had once been used to sell Parker pens. I wanted to stuff birds. The urge to hunt and keep and possess was the trophy thing, I guess. By the time I was taking pheasants, it was all about the heads.
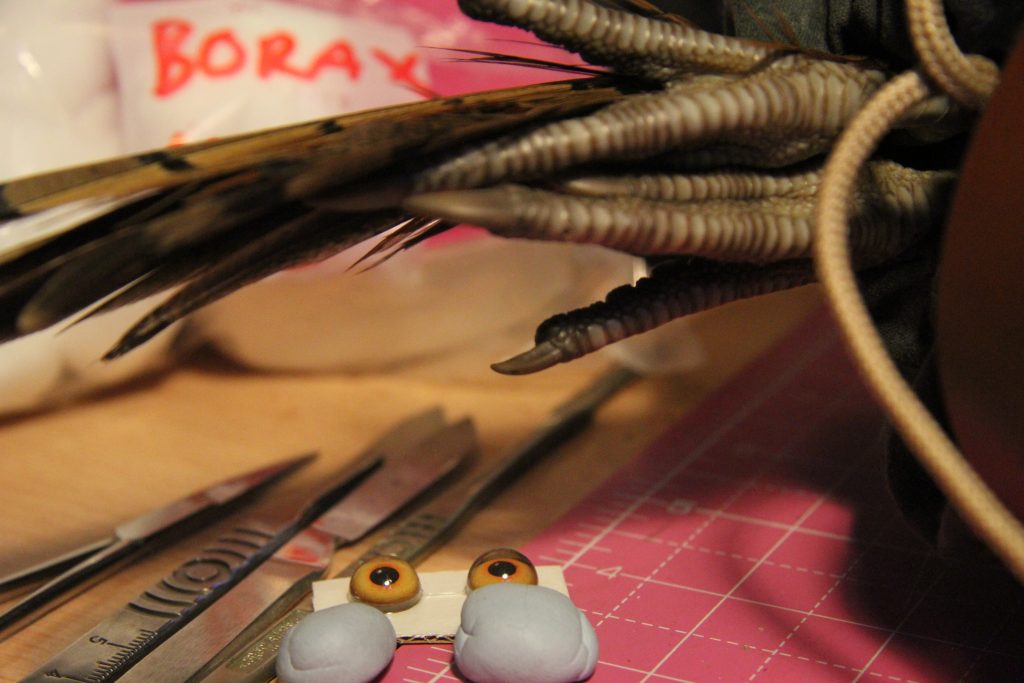
The magical ingredient was borax. In those days you could get it from the chemist’s. These days, “B.P.” or the British pharmacopoeia boxed products and chemicals are not sold the same way and I had to use ordinary table salt for the first head I got last season, and then got some borax from an online supplier, later. Oddly, it is an ingredient in slime as a plaything. All I know is that borax is the best preservative, the same I used as a lad.
Taxidermy means ‘arranged skin’ and that is what a ‘stuffed’ animal, bird or fish is. The word ‘peeled’ sounds more like an orange though, even if it is a more appropriate term.
This little article then, is about how to set up a head of a pheasant. Just like with a massive stuffed buffalo head as a trophy but a lot smaller.
First, you need a pheasant that has been neck shot or else stunned before you whip off its bonce, as a crushed, bled all over the place, smashed cranium is no use to stuff. The pheasants I used to take were with stones forty years ago and were knocked insensible without smashing their skulls.
GORY BIT: A potent 9.5mm smasher to the neck rather than 8mm penetrative ammo is best and you will extinguish a pheasant with a real killer neck shot as fast as if the brain was hit, since the blood supply is immediately interrupted. Cut the head off low on the neck so you can keep the ring feathers.
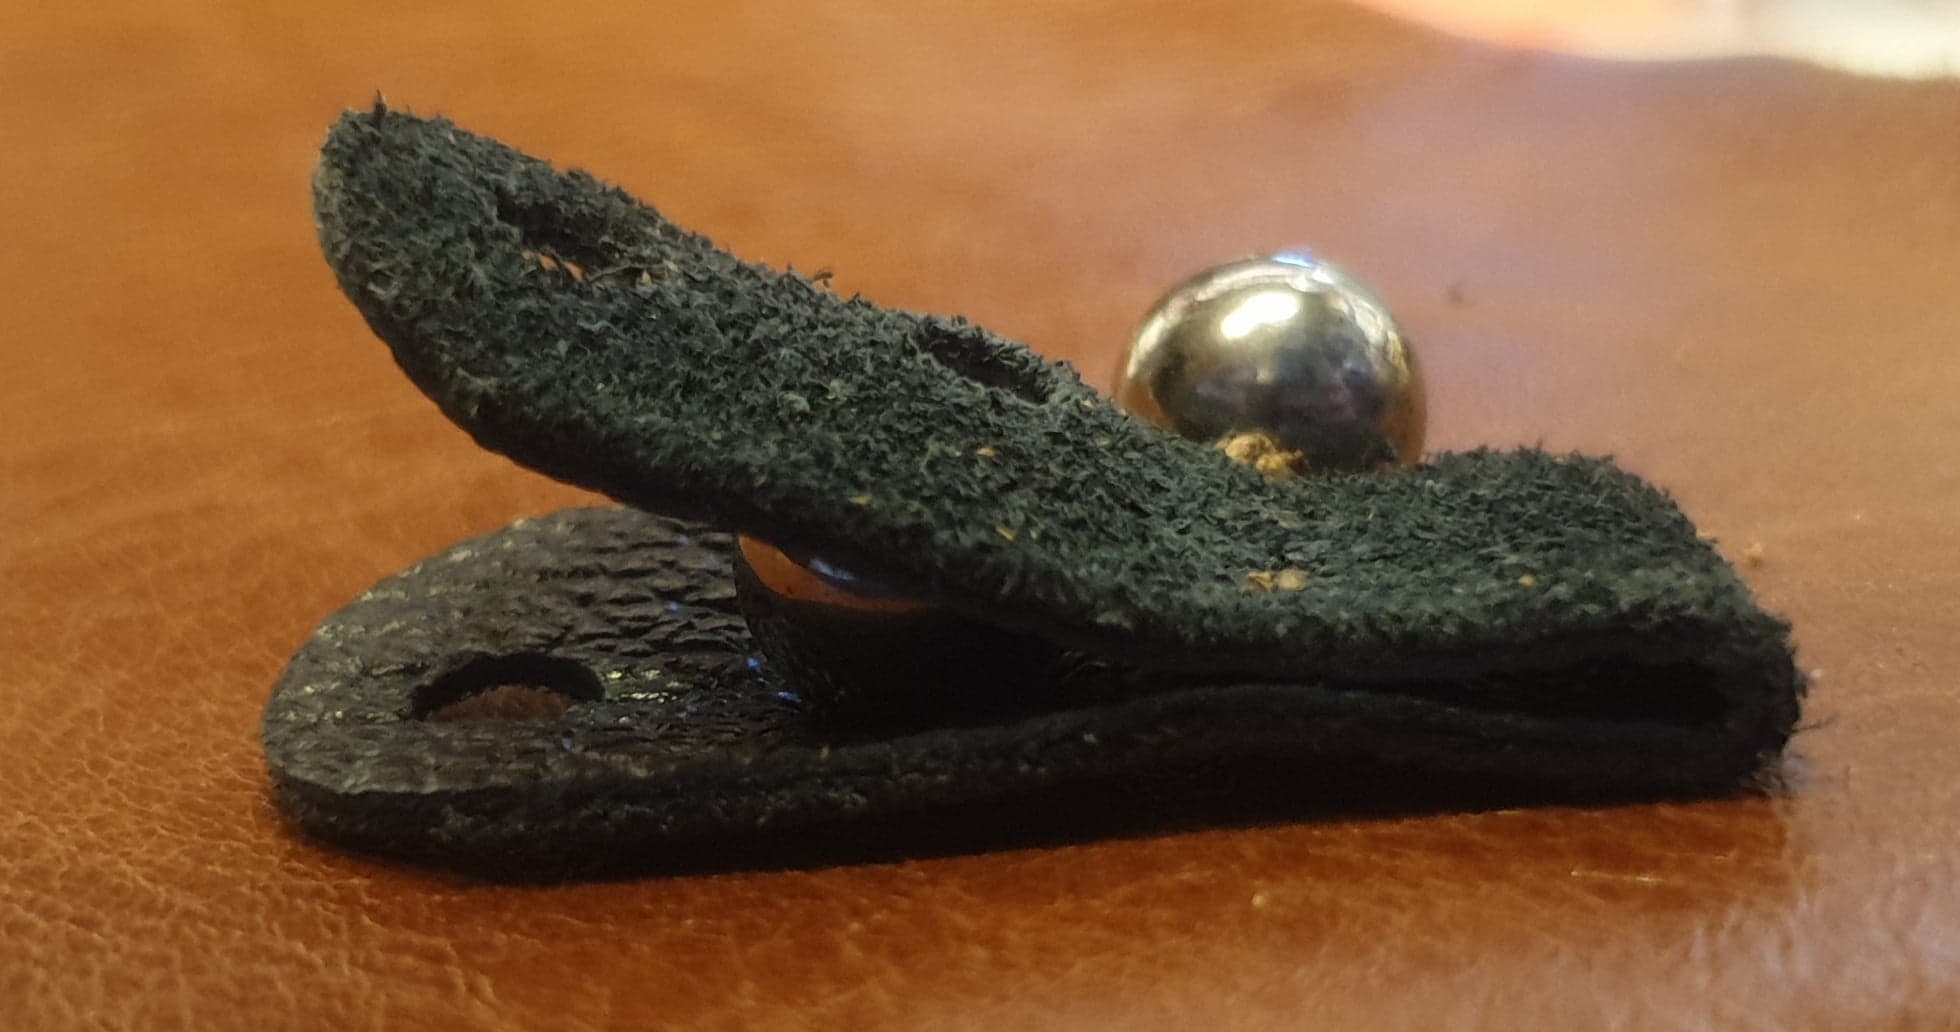
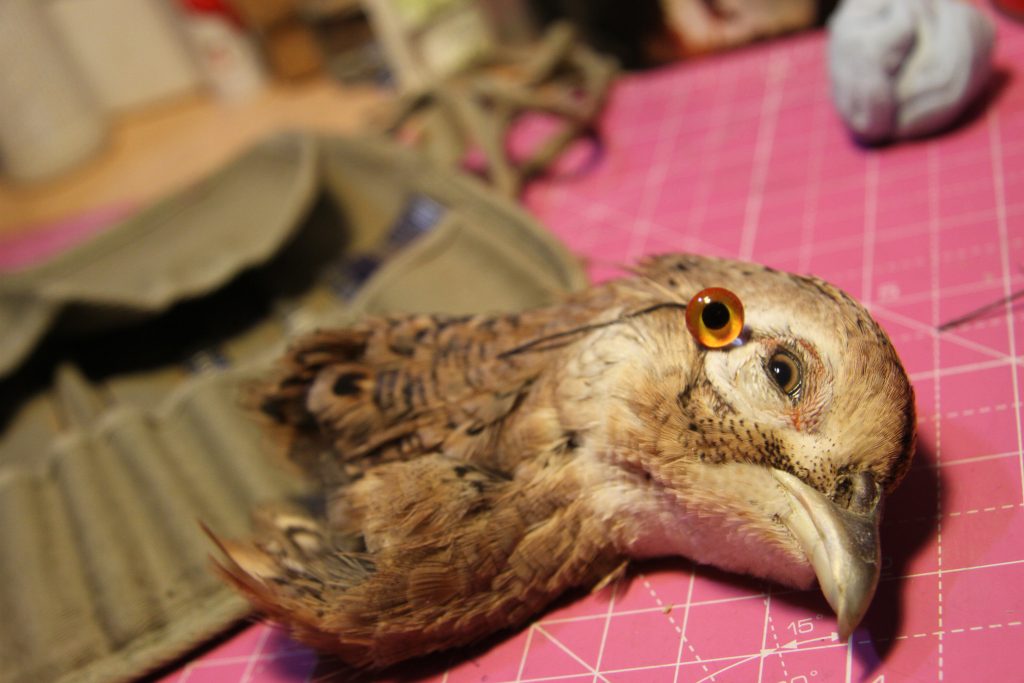
You can use a marble for the eye of a crow or a pheasant. But I actually bought a pair of proper eyes right at the end of my school career and just kept them, unused for decades. The next ones I bought last year online (and both types are seen here) are the button kind, rather than being mounted on a wire, so I used Blu-Tak as a mouldable rot-proof substrate to mount the eyeballs upon.
By the time I got to my A-level biology rat dissection, which is what is that green roll of surgical looking tools in the pictures, was all about, I was a pretty dab hand with a scalpel. So not only did I do well with my poor disassembled rat exam, I also skinned it and dried the skin which freaked out my biology teacher a little.
Thus you will need some skills and odd but true a scalpel blade that is kind of blunted, compared to surgical sharp, is safer and easier to use. That way you will be more likely to skin the pheasant rather than just slash it all to bits by accident.
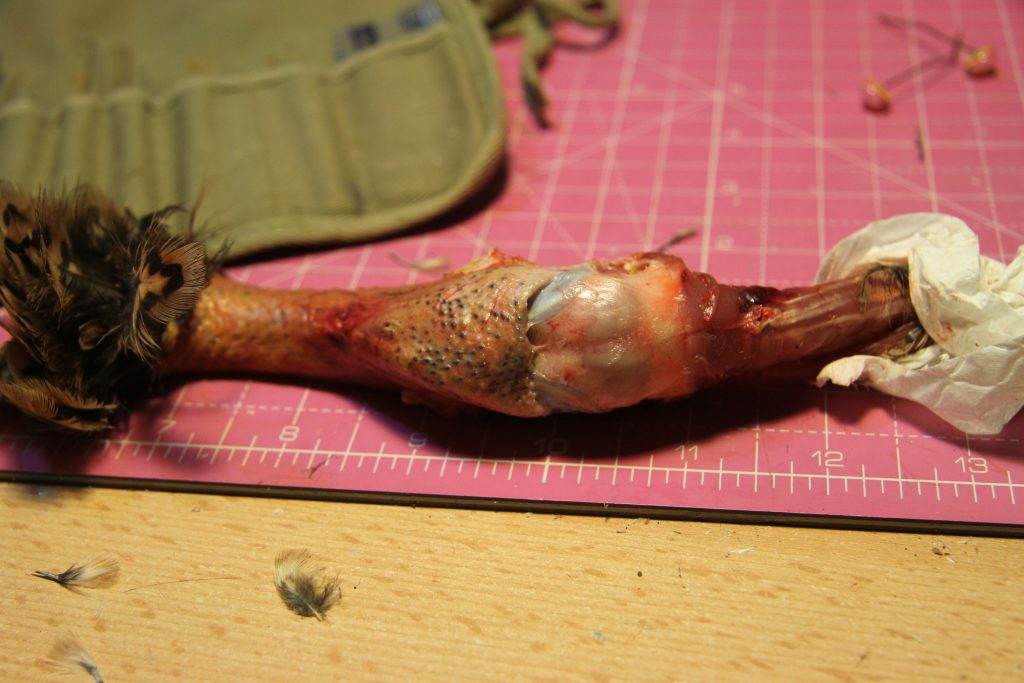
The first thing to do is get all the kit ready and vitally, a bin bag for the detritus. You will need some cotton wool and some tissues – loo roll is fine – and that borax. First, you need to cut a small slice up the skin of the neck on the ventral side so you can flip it inside out around the neck muscle and spine. This is literally a bit odd feeling as the feathers will have to be taken with. The neck is pushed up and you literally try to make the skin come back like a sock being pulled off. Use the scalpel to slice against the neck to allow the connective membranes to be released from the skin and work it back up to the skull. Pushing the skin up around to reveal the skull is the delicate part and you will need to cut a good few times against the skull to release more connecting membranes until it looks like this.
The next bit is a combination of delicate and brutal. You need to further peel back and skin the head such that the eyelids are gently parted from the eyeballs to give that de-gloved look. Before then, you will have carefully sliced out the ear openings. This will take care and skill. As will removing the eyes without breaking the delicate eye socket bones, or bursting it. These are tough and you can release the connective tissue membranes around and eyeball and lift it out enough to cut away the optic nerve at the back to reveal a really surprisingly large space. The bit of the eye we see on the face of a pheasant, is only a part of the whole organ. The brutal bit is that now you need a bigger and stronger blade, maybe a good set of surgical scissors, to slice the back of the skull clean off so you can scoop out the brains.
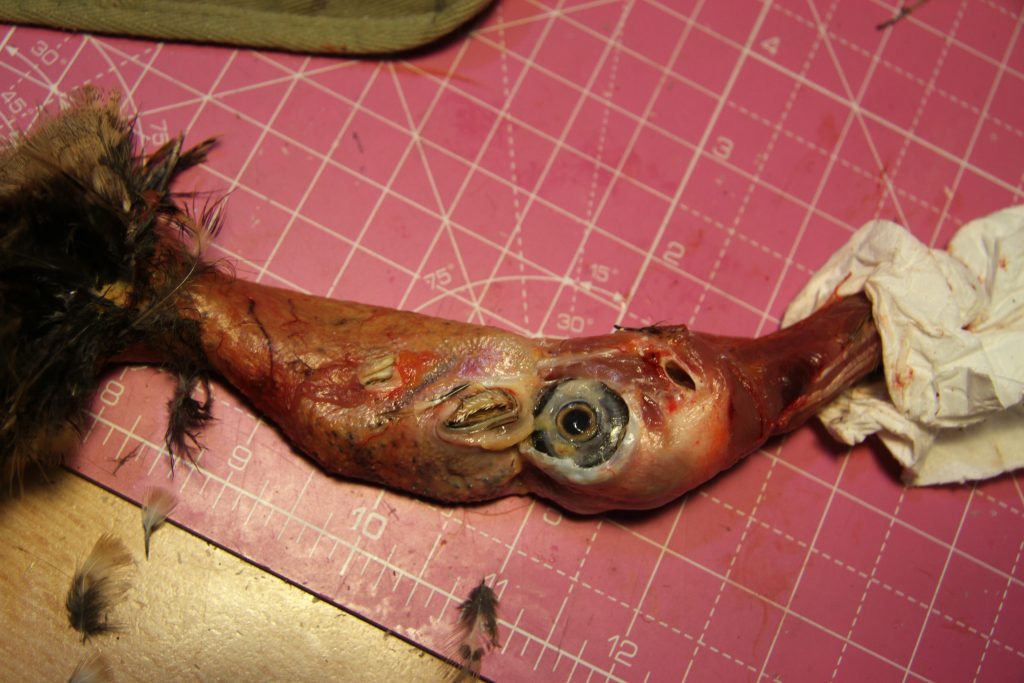
Basically, you need to remove as much soft tissue from around the skull as possible. That means the tongue will be sliced out and also the muscles that operate the beak. This too can take more or less time depending upon your skill.
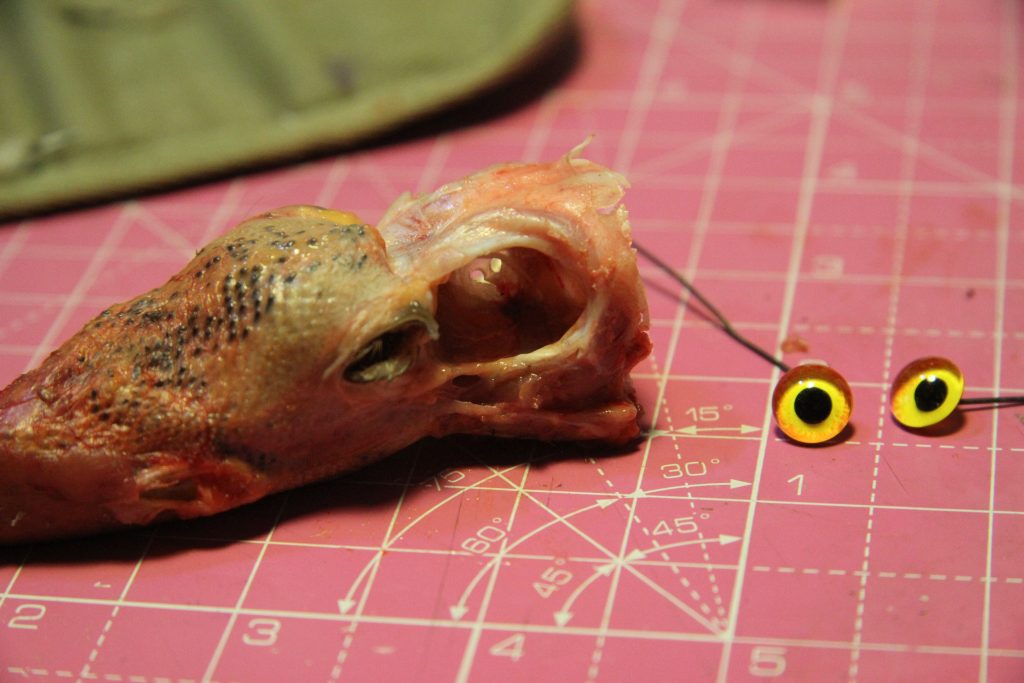
Leave enough skull to allow the skin to take the right shape when it is turned back the right way. But before you do that, you must pat dry the skin and parts left with the loo paper and then coat liberally with borax powder. Then you have to mount the eyes. With marbles, think about where the pattern ends up as the part in front will be seen. Likewise, the taxidermists’ supplies eyes on wires or as button type, both need mounting. The wires I moulded, the Blu-Tack I shaped and plucked until it was the right shape and size.
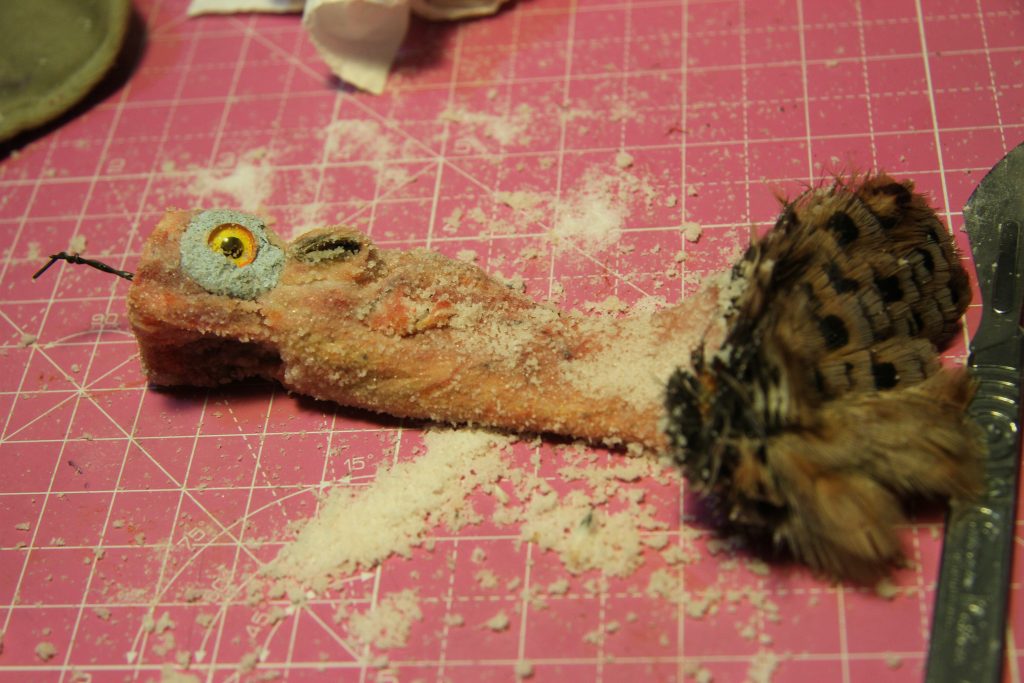
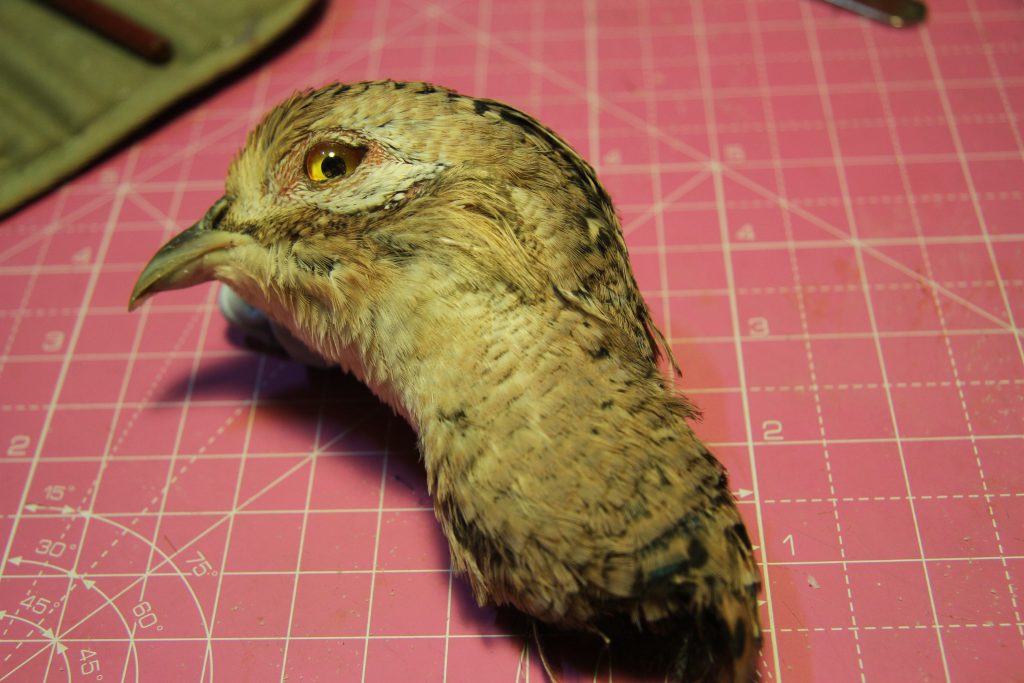
Then, you will be placing some cotton wadding and borax into the skull. Just enough to fill the shape, not make it bulge. Do this by putting just enough to get a purchase upon as you push the now abbreviated skull back into the skin with a finger. This is a delicate operation and when done, you will need to groom the feathers and wattles back into some semblance of neatness (I love the ones with ear tufts) and also make sure that the eyelids are shaped naturally around the marble or taxidermists’ eye part. The eyelids dry out fastest and will stick to the replacement eye, so make sure this is perfectly shaped with a tiny tool before carefully placing in the airing cupboard to dry.
Thing is, when doing this so long ago, I nabbed more than I could stuff and put a few heads in a bag in the freezer. I sort of asked my mum at the right moment if it was OK to keep them there until I could deal with them and promised that they were well sealed in a knotted bag. Of course, months later, I am sat in the kitchen when mama is fossicking through the freezer sorting diner and wondering what the bag was, had opened it and reached inside before I could see what she was doing.
The shriek of horror as she withdrew a frozen pheasant’s head in her hand before dropping it was entertaining enough but I sort of lost my freezer storage rights as a result.
I did point out that it was all the fault of the book they gave me.
POST SCRIPT: I know a good few of you are interested in Taxidermy. John Webb, Richard Rogers and others have stuffed.. stuff. I love it, since truly good taxidermy is a high art if truth be told.